The Production “Workflow” of Our Live Online Streaming Shows at Stay Curious
As I started the Stay Curious Café in September last year, and after thinking a lot about whether I should run an online event or not, I thought I write a blog post about what the setup and workflow preparing a show looks like right now. This, obviously, is subject to change as I tweak things here and there and try different soft- and hardware.
I have written a quick post over there at my own website in December, which plainly lists the hardware I use. Since then I added a few more things and I am going to update the post soon or write a follow-up. For the German speaking people of you: I might also do a few how-to videos on the things I use, plus some videos about new hardware I get on my neu•gierig website.
But now, let’s dive into it …
Planning a Show
By the end of June I am going to have organised 20 shows already. One every two weeks with two guests (or more sometimes) and live music each. Like with my beyond tellerrand events, I am not having a specific focus on a certain technology or genre, but love to chat about creativity, technology, design and all sorts of things that inspire us, with people that are highly inspiring and motivating. Hence the name of the online series: Stay Curious. If you have a look at the past Stay Curious shows, you’ll find a great variety of designers and developers from all over the world who have been my guests so far.
I use Evernote to organise, when I sent an email to someone, for which date I asked people and who might be a good fit as second guest, if I don’t have a matching pair in my mind from the beginning. Next to this I write down a few “themes”, which I like to pick to title each show, to not simply number them “Stay Curious #1” and so on. I don’t put too much importance on this theme, though I try to somehow find something that fits my guests work, character or topics. Sometimes when I speak to my invitees, someone even comes up with a fitting explanation after we picked a name for the show. Like Greg Ruth did here:
I’m happy with any of these, but the black/white option seems perhaps the most interesting as we both work in color more often than not, but all created from black and white underpinnings. There might be an interesting conversation about tones and values and the naked use of black and white as a way communicating more directly.
I have no specific order of who I want to invite or what topic should be covered next, though I like to have an eye on a balanced line-up with a good range of personalities and topics. I think in general anyone has an interesting and often motivating story to tell, if you listen to them.
Kirby – the CMS I use
As soon as I have confirmed a guest, we find a date and a topic, I collect their details (a photo, their links, a short bio, title and description of their talk) and then I add it to my website as a draft. I use Kirby and with that it was super easy to create a customised admin area for the Stay Curious shows.
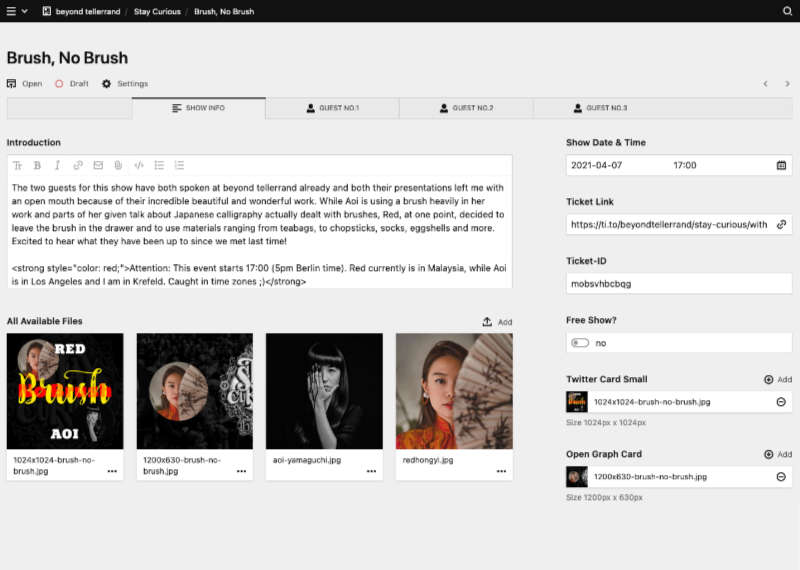
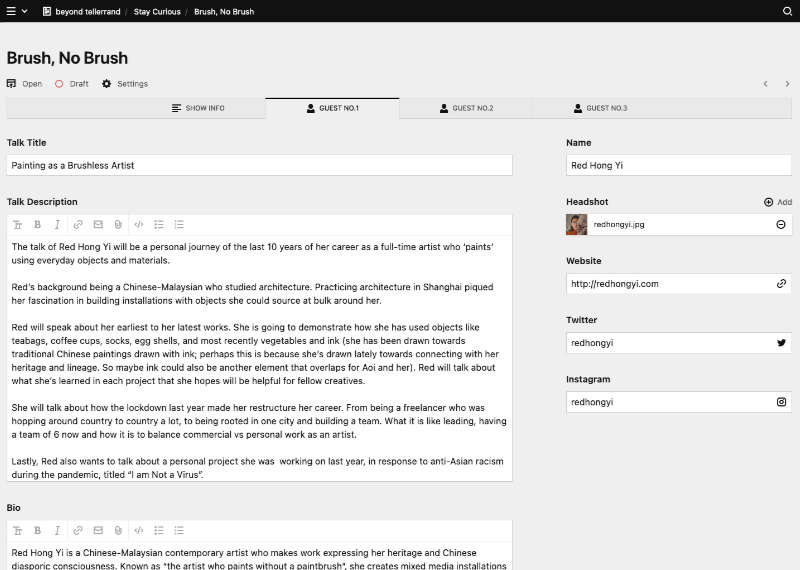
Recently one of my guests, Yuko Shimizu, mentioned, that artwork works much better for her on social media than her face or photos of people in general, so I might also ask for some work examples to be included in addition. I remember that my friend John once said the same, when we spoke about what he includes with the speakers speaking at his event and he said, that when he was telling people of a new speaker, they often did not know the name, but their work. Makes sense. Especially with guests from the design field.
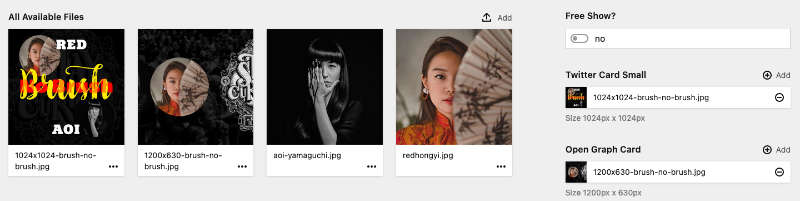
When I am done with the speaker details, I create the social media cards, that will be used when I link to one of the shows. I create a 1024px × 1024px card, where I use the speakers photos (maybe artwork in the future), plus a 1200px × 630px Open Graph Card. Something I need to work on and improve to be a bit more eye-catching, maybe.
Like with the tickets (see below), I automated the process of shows to be over. As soon as the show date is in the past, they are automatically categorised as “past show” and will be shown accordingly under the list of past shows.
Info: if you want to learn more about Kirby, you can visit their new website which does a good job in explaining what Kirby is, for all different kinds of use cases.
Tito – Tickets & Communication with Attendees
As soon as I have sorted all details and gathered everything, I create my tickets, using Tito, the ticket system I use for all my events. Vito, the event platform I use (see below), also has the option to sell tickets, but it does not give me the flexibility and options, Tito gives me.

When creating the ticket, I use the option to make the ticket price donation based. That means, I set a suggested donation/price and a minimum donation/price. People buying a ticket have to pay a minimum of €10 (incl. 19% German VAT), but can pay more, if they want and like to support the show, which thankfully quite a few people do. I furthermore schedule the ticket to be available until 1am on the night after the show, which means, that they automatically end and go off sale, marking the tickets as “Sale ended” on the beyond tellerrand website also.
In addition to this, I use the feature to create a so called activity to attach a calendar file to the confirmation email and create a schedule on the Tito page for Stay Curious. The activity is then automatically included with the chosen ticket and gives the attendee the option to add the date and time to their calendar.
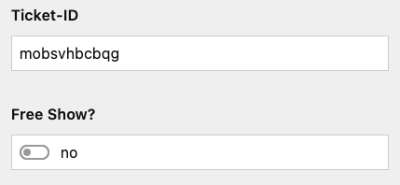
When this is done, I copy the ticket ID to use it in my admin panel. The ID is used to automatically create the embedded form on each Stay Curious show page with help of Tito’s widget. If the show is a free show, I activate this in my Kirby panel and a different form plus different instructions for the ticket buyer will be used below the embedded form.
What I always loved in Tito for my beyond tellerrand events is, that I have the ability to not only sell tickets, but communicate with the attendees and include useful information in a personalised email sent via Tito. In this case I send one email close to the Stay Curious online event with instructions where and when we meet, which links they need and how the schedule for the event roughly looks like. I also include a link to a time zone manager, linking the time when the event starts, as I myself am so bad with time zones that I always fail with them. A time zone manager like Every Time Zone helps you to create a link that attendees can click and check their local time, when the event takes place. Useful, especially for online events, where people can dial in from all over the world.
On the day of the event, I export a CSV from Tito and import it to Vito, to have the user data ready. I then send invite links from Vito to each of the attendees, where they get a custom link to join the show they got a ticket for. The only downside right now is, that people who book a ticket late to the game, sometimes only minutes before the show kicks off, have to be manually added by me. No hard work, just something you have to consider, when using an external ticket system.
Info: if you want to find out more about Tito, you can visit the new Tito hub with lots of information.
Vito – the Event Hub
Vito is a fairly young platform, which offers a good way to create a hub for your community to chat and watch your streamed or pre-recorded videos. I decided against the known players like YouTube, Vimeo or alike to create a space that feels cozy, friendly and private and which is without any pre-defined expectation. Vito is from the same people who own and run Tito, the ticket system I use and that has one big benefit also: I know I can trust them and they do a wonderful job for anyone using their tools.
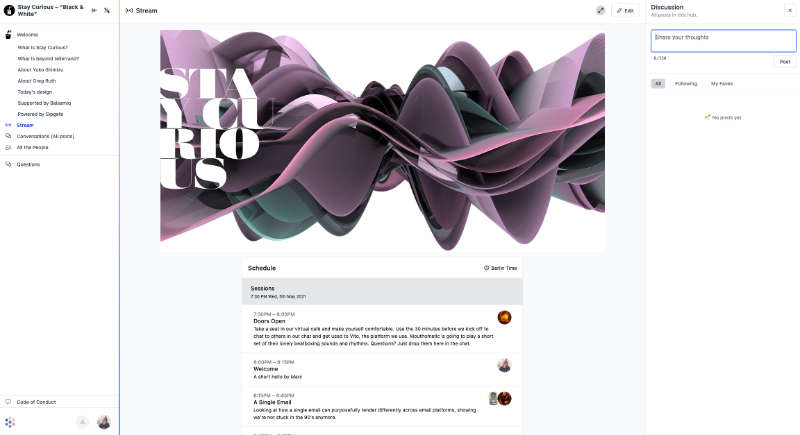
Vito comes with a clean design, giving you the option to use your brand assets to add your touch to the platform. Since they don’t have a white labeling option (yet), it is nice to being able to use video placeholders, header images and icons, that match your voice and tone.
If you don’t want to use a separate ticket system, like I described above, Vito gives you the tools to sell tickets and register people directly within Vito with a Stripe checkout.
I myself create a new hub for each of my shows, accept for series, like the series about and around Kirby, that I run with Bastian Allgeier. But you can also create one hub and have this being the community hub for all your shows, which holds the live stream of your actual event, but also the recordings and conversations of past events and additional material such as recorded videos by you.
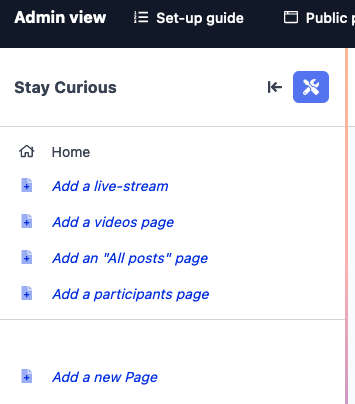
In each new hub, you have “Home” pre-defined and you have a set of standard pages you can create with one click:
- Live-Stream
- Videos
- All Posts
- Participants
In addition to this you can create as many pages in the sidebar as you want. I use this to create a page for each guest and write about them. I include a short bio, links, where to find them and maybe a bit about their work. Furthermore I add pages for the partners (aka sponsors) of each show and about pages for beyond tellerrand and Stay Curious, as you can see in the fullscreen shot of the Vito hub above. Last but not least I create a separate chat for questions only and ask attendees to place their questions for the guests in this chat, so I can easily find them to discuss and answer those within the Q&A part.
Vito is quite flexible with what you can use in each custom page you create, but going into detail here, would be too much and I link to information about Vito below this section.
Next thing I create is a schedule for the show, which I always base on:
- Doors Open (with live music, mostly by Baldower) – 30 minutes
- A Short Welcome – 15 minutes (of which I mostly need 5–10 minutes)
- First Presentation – 30 minutes
- Short Refreshment Break (with live music) – 15 minutes
- Second Presentation – 30 minutes
- Q&A and Conversations – 30 minutes
- Goodbye Tunes (with live music) – 15 minutes
This is my basic schedule I use as a template. Based on this, it could change, depending on what the guests plan to do. Not only duration of the presentations can change – where I ask them not to go longer than 40 minutes – but also whether both presentation slots are with both speakers for example.
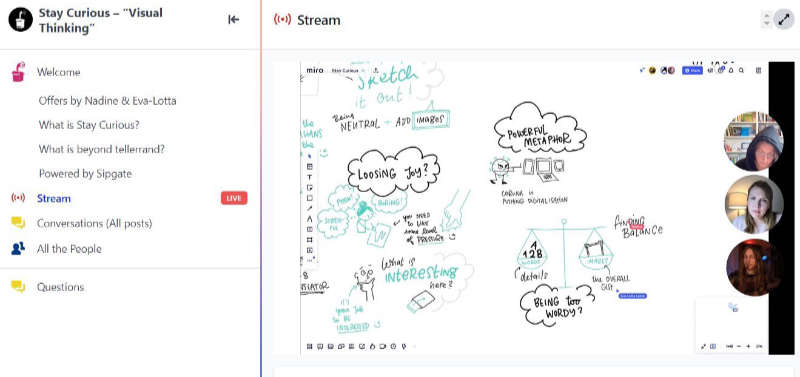
Mark Robbins and Rémi Permentier did this and played ping pong in their two slots, which was quite snappy and nice. Eva-Lotta Lamm and Nadine Roßa also presented together, but as their topic was “Visual Thinking”, they used a huge Miro board to collaborate and answer questions with drawings. Lovely idea that worked well and was highly entertaining.
Info: if you like to learn more about Vito, how it works and what the idea behind it is, check their hub.
Ecamm Live – Where the Video Part Is Created
When I started, I used Zoom to create the video/interview part of the show, which is the presentations and the conversation afterwards, plus the live music. I quickly reached a point, where the possibilities in Zoom reached the limit for what I wanted to do and the layout and design options were too limited. Furthermore any stream had a huge Zoom logo in it. Yes, you can pay to get rid of it and use your own logo, but it still leaves a “Powered by Zoom” subline in it.
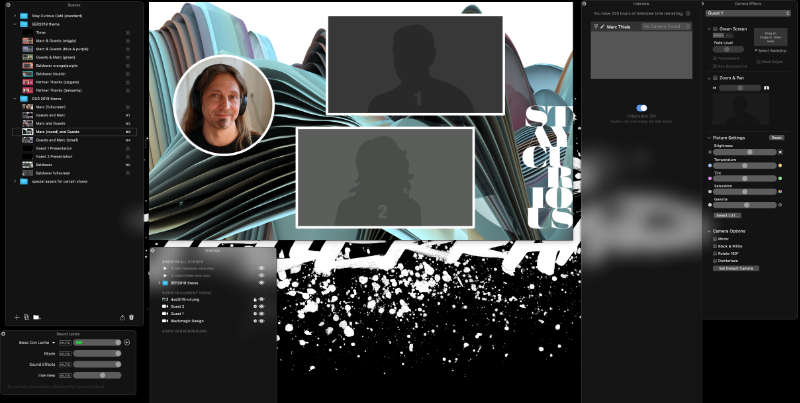
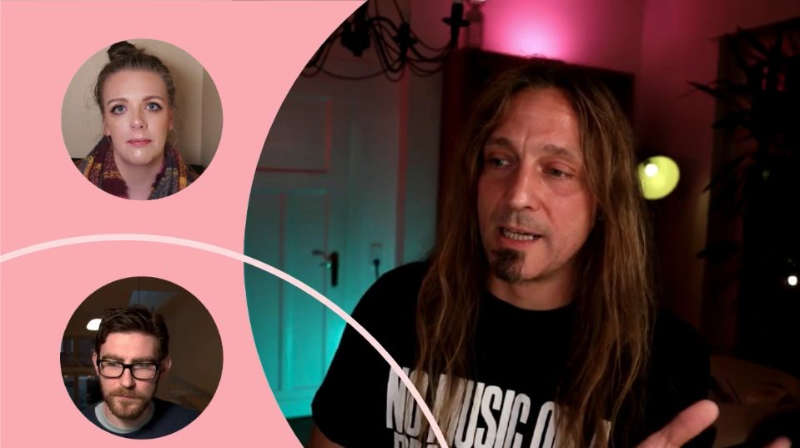
In Ecamm Live, I set up a number of scenes which I can use in each show. It is highly flexible and easy to use. I create a scene, where the musician gets full attention, one for each guest where their video is shown fullscreen and one, with the presentation in full plus a small overlay of their video. I then add a couple of layouts, with my two guests and myself for the Q&A.
My guests get a link to join me in my Ecamm Live session. This is their Interview Mode, which Ecamm released not too long ago. My guests don’t need to install anything and only need their browser (to share their screen, only Chrome works right now sadly).
What I like at Ecamm Live – and this is a huge pro over things like Zoom – is, that I can modify my guests camera image on the fly. If they have an oversaturated image, I can easily adjust it. If they sit too far away from the camera, I can zoom in and pan their camera to fit. With this I don’t need to get them to do this and am not making them more work than needed. You can’t expect everyone to have a good camera and microphone, but you can ask what they have, to maybe improve audio and video, where I personally think audio is more important to sound good than to have a crips, high quality video.
I also love the ability to use overlays to create good looking effects, use design assets for a personal touch and create things like lower thirds.
That is my basic setup for Ecamm Live. I could go into detail, but like with the other parts, I don’t want to go too much into detail (but am happy to answer any questions you have).
Info: if you want to dive deeper into what Ecamm Live can do, check their product page with more resources also.
Additional Software
Next to the main things above, I use additional software that supports the production. Here is a short sum-up of what is running in the background.
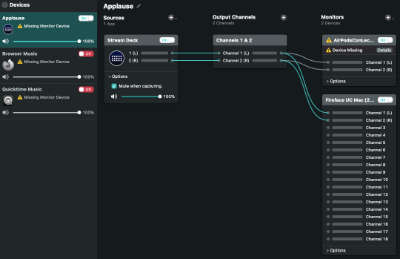
For a long time Loopback by Rogue Amoeba is installed on any of my machines. It is not cheap with roundabout $120, but worth every penny. You can create you own audio routings and virtual devices from literally any software on your machine, set as a source. You can then pick any of these virtual devices in all of your software like Audition, Zoom, Skype or Ecamm Live as audio source. I use it to play sounds with my Stream Deck and route it to channel 1 and 2 of my RME audio interface and my Airpods Pro as monitor device in addition for example.
Talking about the Stream Deck: I usually run their officially Stream Deck software to use the Stream Deck for my video, audio and light setup (see below for how I do this). In addition, I also configured Companion by Bitfocus to being able to control my ATEM Mini. But typically, I don’t use this scenario in my live streaming setup.
Another bit of software that sits in my menu bar during the show is Elgato’s Control Center which simply controls my key lights (see below) and which needs to run in order to control the key light with my Stream Deck also.
Light Setup
Light is an important factor. Nothing that is too obvious for the attendees in the first place, especially during the day, with having a window and days light in your room. But for a good image and the right cozy feeling, I love to play with my current light setup – which always can be improved surely.
Here is the light I use at the moment:
Key Light
As I don’t have much space behind my desk in my current setup, I decided to get two Elgato Key Light Air as my key lights, the main light source. They don’t take up much space and do a good job in general, though they are certainly not as soft from the light, as I good key light with a light dome or soft box. Price in comparison what they do for it is good for me.
Hair Light
”Well, Marc, you have a lot of hair and might need a hair light, but what about me?”, you might think. But that is not meant with something you call “hair light”. Yes, it should light up your hair or head, but mainly has the job to separate you from the background (like a rim or side light as well for example). Usually the hair light is placed slightly behind and above yourself, gently pointing forward to strike your head and your shoulders. Positioning depends on the effect you want to achieve, though. I use one of my Aputure MC lights with its silicone diffuser as my hair light and set it to a warm white and between 15% and 20% intensity.
Ambient Light

To create a cozy atmosphere, I am using Play Light Bars by Philips Hue and other Hue bulbs.

I have chosen to use coloured light and not only a variation of white tones, as I wanted to draw a connection and keep the theme of the light setup, I use at the beyond tellerrand events on stage and in the theatre, which usually plays with red and blue light and sometimes added yellow as accent. I created a few different scenes I can switch between. Even if I am invited to be a guest in another show, I try to match their colours also with my background light.
Microphone and Audio Interface
In general I have to say, that the choice of your microphone comes down to your preference and your voice actually. Play around with a couple of microphones and find out which sound you like. I love my Shure SM7B. It gives me that radio moderator voice and a warm touch, which I really love. The downside, at least when you film yourself, is that you need to have it quite close to your face to use it in this way and get the best sound out of it. Therefore this is my choice of preference when I record audio material or my podcast.
When I run my streamed live shows, I wanted to get the microphone out of the video image, though. I was looking for something to be placed above me, right out of the image. I researched which shotgun mics do the best job. Surely there are many, many options and some of the many videos about this topic are this one by Caleb Pike or this one by Curtis Judd, that help deciding which to try.
For me it came down to a decision between the Sennheiser MKH 416 and the Røde NTG3. As the NTG3 always got pretty good reviews, plus the recordings were very close to those of the MKH 416, I went with the Røde NTG3. My final decision also was a cost decision as the NTG3 with slightly below €600 is nearly half of what the Sennheiser costs with €999.
The microphone is plugged in to my RME Fireface UC which is brilliant quality, though not too easy to use with its software on the Mac. Total Mix, in my opinion, has a pretty fiddly UI, but once you get used to it and the way it works and you got it set up, the device and its audio quality is fantastic. From the Fireface, I run the audio into my ATEM Mini (see below for what the ATEM Mini is), where I tweak the sound and set it as the source for Ecamm Live.
Camera and Lens
I am using the Canon EOS R, I owned before starting Stay Curious together with my Canon EF 24–70mm f/2.8L II USM. That gives me the option to zoom in and out to choose the preferred view, as I am not standing on the same position in each of the shows. The aperture is set to f/2.8, which gives me a soft and slightly blurry background, that I like a lot.
The EOS R is connected to my ATEM Mini, used as my capture card, via its HDMI port.
Video Switch (or Capture Card) and Monitor
To get the video signal from my EOS R into my Mac, I use one of my Blackmagic Design ATEM Mini. There are several versions of it now, but the standard one, without streaming or ISO option works perfectly, if you use the setup I describe above. I like to use the ATEM Mini, a switch with four inputs, over an Elgato Camlink for example, as I have the option to use more than one camera or even use the HDMI out of my Mac as a “camera”, to switch to it without the need of sharing my screen via software. Again, don’t want to go too much into the technical details here, but feel free to ask, if you want to know more.
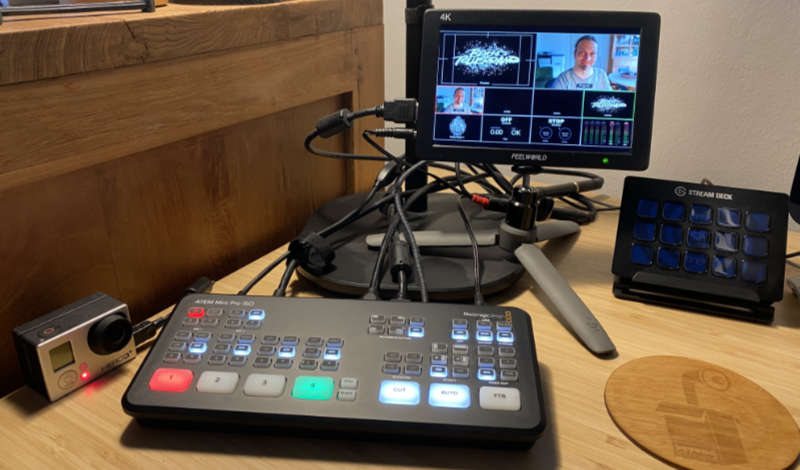
You can see the ATEM Mini on the lower left of this photo. Next to the ATEM Mini, I use a 7" monitor as my multi view monitor, to administrate and check the ATEM Mini. The monitor I use is a Feelworld 4k monitor, which has an HDMI in and out, which has the benefit, that I could use the HDMI out of the ATEM Mini route it through the monitor and – if needed – have it end at a bigger monitor after that. One great plus also: the ATEM Mini lacks an audio jack to monitor your audio with your headphones, but the 7" monitor has a 3,5mm audio jack, which solves this problem.
The ATEM Mini is a small device, but has powerful hard- and software control options: you can fully control the switching via software, you have a media library, fantastic audio tools and – if you got Blackmagic Design cameras – you can even control the cameras out of the software control panel. Just to mention a few things.
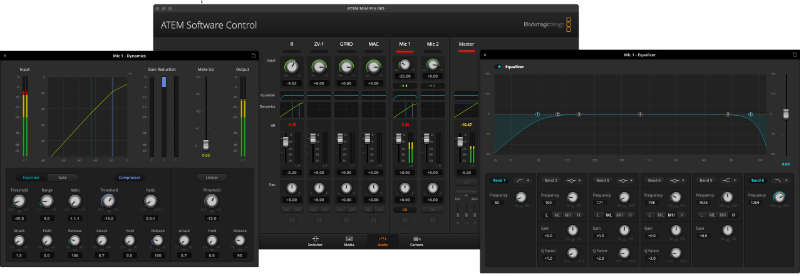
As for the audio settings, I set a simply high pass filter as well as a low pass filter (you can see this in the right part of the image above). With the high pass filter I get rid of anything below 90–100 Hz which usually is not needed in spoken audio. It helps to get rid of this kind of base hum. To get rid of unused frequencies on the other end of the spectrum I use – yes you guess right – a low pass filter and get rid of anything above 10–12 kHz. You could now get rid of more unpleasant frequencies that might be typical to your voice, but once more: this would lead too much into detail and I can recommend a good and clear explanation video by Alex Knickerbocker.
To get an even better sound in my stream I now do a few simple settings in the dynamics, in the expander, compressor and limiter (show in the left part of the image above). As the details here would lead to far away, please check this fantastic video by Curtis Judd, where you get a good overview of what you can do without too much work to make your audio much better and less noisy.
Info: There is a range of different ATEM Mini versions on the market now. A switch only, one with streaming possibilities, another one with streaming options and also ISO recording. Lately they release an “Extreme” version with more inputs, slightly bigger and other additional features, such as super source. If you want to know more, check the website of Blackmagic Design.
Stream Deck – Controlling Ecamm Live, Audio Effects and Light
The Elgato Stream Deck is a nice little helping tool. A bit of hardware, that you can use for man things. I mainly control my scenes in Ecamm Live with it, as well as my audio effects (like applause for example) and light setup.
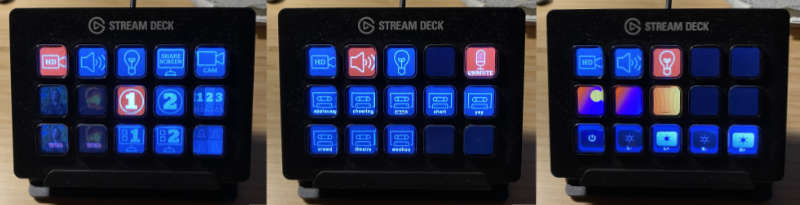
To control scenes, audio and light, I have created three different profiles on my Stream Deck, between which I can switch to control various applications from one place. Like the Hue Lights, Ecamm Live, sounds played from the system or my key lights. Profiles for the stream deck give you a nice option to use more buttons on different “pages” of the Stream Deck. So, even if you don’t have the Stream Deck XL version, you can configure the smaller version in a way that you have much more options than on a single “page” of the Stream Deck only. Furthermore I created all custom icons with active and inactive states – yes, sorry: I am a nerd – to have a nice look and feel also.
Info: More information about the Elgato Stream Deck can be found on their website.
M1 Mac Mini – the Streaming Machine
When I started, my 16" Macbook Pro did a good job with the streaming, but … the fans! When I ran any streaming software, the fans of this machine – a 2019 8-core i9 machine with 64GB ram – went crazy. Even though, I never had anyone complaining about the fans or hearing them, I knew they were blowing off like mad.
With this new 16GB M1 Mac Mini, everything is completely silent. No fans, no noise and everything works like a charm. I run the streaming software on this machine and also all the other bits that I mentioned above to have full control on one computer.
Additional Hardware
During each show I wear at least one of my Airpods Pro. Again I have chosen them over my Audio-Technica, which clearly have the better sound, as the airpods are nearly invisible. But really: I think it is essential to use headphones to avoid an echo of what you hear on your side through your mic.
I use my Macbook Pro as second computer to log in as guest user to double check that everything works. But not only do I log in with a second registered computer at the show: I also register with a second email to get all the attendee emails, use the links everyone gets, check the chat as a regular attendee and so forth. With this, I hope to not miss any of the details and forget anything that an attendee needs.
What’s Next?
I try my best to evolve Stay Curious and not let it become boring and the same thing each time. Recently I started using design assets from past beyond tellerrand events to give each show a fresh, surprising and different look and feel. I write about the background of the used design, like who created it and when it was used and so on, to include people on the full journey.
That’s it for now. What I have written above is what Stay Curious is now and what it became after running it for 9 months. As it always is poisoning to stand still, I will continue to improve and shake things up.
One of the most important parts, though, is to listen to constructive feedback from those who come and join your shows! Online or offline.